When the winter rains finally subside and the rolling hills of the San Francisco Bay Area turn a vibrant green, homeowners know that a seasonal shift is underway. Spring brings beautiful weather, blooming wildflowers, and a much-needed break from running the furnace on chilly nights. However, this transition period also signals that it is time to shift your focus from heating to cooling.
Your heating, ventilation, and air conditioning system has worked hard to keep you warm over the past few months. Now, as the days grow longer and temperatures begin to climb, your air conditioner needs to be ready to take over the heavy lifting. Waiting until the first major heatwave to test your cooling system is a recipe for disaster.
Preparing your HVAC system in the spring ensures a seamless transition into the warmer months. It protects your equipment from sudden breakdowns, improves your indoor air quality, and keeps your utility bills manageable. This comprehensive spring HVAC checklist will guide you through the essential tasks required to optimize your system for the unique demands of the Bay Area climate.
Understanding the Bay Area Spring Transition
The Bay Area climate is famously unpredictable. Our unique geography creates distinct microclimates, meaning the weather can change drastically depending on which side of the hills you live on. Coastal areas might still experience morning fog and cool breezes, while inland valleys start seeing afternoon temperatures push into the high 70s and 80s by late April.
This constant fluctuation forces your HVAC system to rapidly switch between heating and cooling. One day you might need the furnace to chase away the morning chill, and the next day you are relying on the air conditioner to keep the afternoon heat at bay. This back-and-forth places significant stress on your equipment.
Furthermore, spring in Northern California brings a massive surge in pollen. Oak trees, grasses, and blooming flowers release millions of airborne particles. If your HVAC system is not properly prepared, it will pull these allergens into your home, circulating them through your living spaces and aggravating asthma and allergy symptoms. A thorough spring cleaning and inspection of your HVAC system are absolutely vital for maintaining a healthy and comfortable indoor environment.
The Ultimate Indoor Spring HVAC Checklist
Preparing your home for warmer weather starts inside. Many of the most critical components of your HVAC system reside within your walls, attic, or closets. By taking the time to inspect and maintain these indoor elements, you lay the foundation for efficient cooling all summer long.
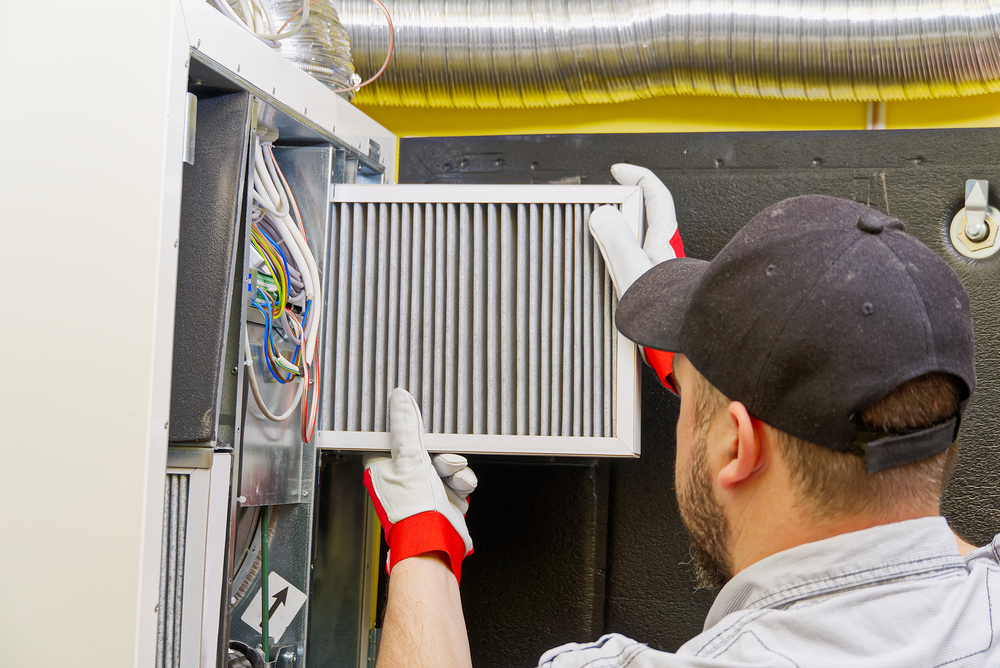
1. Replace Your Air Filter
If you only do one thing on this checklist, make sure you change your air filter. Your furnace has spent the entire winter pulling air through this filter. By the time spring arrives, the filter is likely caked with dust, pet dander, lint, and other microscopic debris.
A clogged air filter is the number one enemy of HVAC efficiency. It acts like a wall, restricting the flow of air into the blower motor. When the motor cannot pull enough air, it has to work twice as hard. This excess strain drives up your electricity bills and can cause the motor to overheat and fail prematurely.
Furthermore, a dirty filter cannot capture the influx of spring pollen. Instead of trapping allergens, the system simply pushes them past the overloaded filter and blows them into your bedrooms and living areas.
Check your filter immediately. If it looks gray and you cannot see light passing through it, throw it away. Replace it with a high-quality pleated filter with a MERV rating between 8 and 11. These filters provide an excellent balance of capturing small particles without restricting airflow. Make it a habit to check your filter every 30 days throughout the spring and summer seasons.
2. Inspect Ductwork for Leaks and Damage
Your ductwork serves as the respiratory system of your home. It carries the conditioned air from your HVAC unit and delivers it to every room. Unfortunately, ducts are often out of sight and out of mind, hidden away in dark attics or cramped crawlspaces.
Over the winter, rodents or other pests seeking warmth might have nested near your ducts, potentially chewing through the flexible material. Additionally, the constant expansion and contraction of the metal joints during heating cycles can cause seals to crack and break.
When your ducts leak, you are literally blowing money away. The cool air you pay to generate escapes into your attic before it ever reaches your living spaces. To compensate, your air conditioner runs longer and harder, wasting massive amounts of electricity.
Take a flashlight and carefully inspect any visible ductwork. Look for disconnected joints, crushed sections, or obvious holes. If you feel air blowing out of the ducts while the system is running, you have a leak. While you can seal small cracks with specialized mastic sealant or foil tape, significant damage requires professional attention. A certified technician can test your duct system for pressure drops and ensure that all of your conditioned air makes it to its intended destination.
3. Test and Calibrate Your Thermostat
Your thermostat is the brain of your climate control system. Before the hot weather arrives, you need to verify that it is communicating correctly with your air conditioner.
Switch the thermostat from “Heat” to “Cool.” Lower the temperature setting by five degrees below the current room temperature. Listen closely. You should hear the indoor blower motor engage, followed shortly by the outdoor compressor turning on. Wait a few minutes and place your hand over a supply register. You should feel a steady stream of cold air blowing into the room.
If the air feels lukewarm, or if the system fails to turn on entirely, you have caught a problem early. Addressing this issue now is far better than discovering a broken air conditioner on a 90-degree afternoon in July.
This is also the perfect time to review your programmable schedule. The schedule you used to keep your house warm in January will not work for keeping it cool in May. Adjust the settings to reflect your spring and summer routines. Set the temperature higher when you are away at work and program it to cool down shortly before you return home. If you are still using an old, manual dial thermostat, strongly consider upgrading to a smart thermostat. These modern devices offer unmatched convenience and can drastically reduce your seasonal cooling costs.
4. Clean All Vents and Registers
Throughout the winter, dust naturally settles on the grilles of your supply and return vents. When you switch your system to cooling mode, the increased airflow can knock this dust loose, sending it flying across the room.
Take a damp cloth or a vacuum with a brush attachment and carefully clean every vent in your home. Ensure that the louvers are open and clear of any obstructions. It is a common misconception that closing vents in unused rooms saves energy. In reality, modern HVAC systems are balanced to push a specific volume of air throughout the entire house. Closing vents disrupts this delicate pressure balance, forcing the blower motor to work harder and potentially causing the evaporator coil to freeze. Keep all vents open, clean, and unblocked by furniture or heavy curtains.
5. Check the Condensate Drain Line
As your air conditioner cools the air, it also removes humidity. This moisture collects on the indoor evaporator coil and drips into a drain pan. From there, it flows through a PVC pipe—known as the condensate drain line—and safely exits your home.
Over time, algae, mold, and sludge can build up inside this damp pipe, creating a stubborn clog. If the line becomes completely blocked, the water has nowhere to go. The drain pan will overflow, sending water spilling into your attic or onto your ceilings and floors. This causes severe water damage and can lead to dangerous mold growth within your home.
Locate your indoor air handler and find the PVC drain line. You can help prevent clogs by pouring a cup of white vinegar down the condensate drain access pipe every spring. The vinegar naturally kills algae and breaks down sludge without damaging the plastic pipes. If you notice water pooling around your indoor unit, call a professional immediately to clear the line before it causes extensive damage to your property.
The Essential Outdoor Spring HVAC Checklist
While the indoor components distribute the air, the outdoor unit—the condenser—is responsible for actually releasing the heat gathered from inside your home. The condenser sits outside year-round, exposed to the elements, rain, and debris. Preparing this vital piece of machinery is a crucial part of your spring checklist.
1. Clear Debris Around the Condenser Unit
During the Bay Area’s wet and windy winters, your outdoor unit likely accumulated a significant amount of debris. Fallen leaves, pine needles, twigs, and dirt often pile up against the base of the condenser.
Your air conditioner needs to breathe to function properly. The fan inside the condenser pulls outdoor air through the metal fins to cool the hot refrigerant gas. If debris blocks these fins, the system suffocates. The compressor will overheat, the system will lose its cooling capacity, and your energy bills will skyrocket.
Walk outside and inspect the area around your unit. Remove any leaves, branches, or trash that have gathered against the metal casing. Take a pair of pruning shears and trim back any bushes, shrubs, or tall grass growing near the system. You must maintain an absolute minimum of two feet of clear, unobstructed space around the entire perimeter of the condenser. Furthermore, ensure there are no low-hanging branches or awnings blocking the airflow directly above the fan.
2. Inspect and Clean the Condenser Coils
The metal fins on the outside of your condenser protect the delicate coils inside. These coils are responsible for releasing heat into the outdoor air. If the coils are covered in a thick layer of dirt, mud, or grass clippings, they cannot transfer heat effectively. The dirt acts as an insulating blanket, trapping the heat inside the system.
Cleaning the exterior of the condenser is a task most homeowners can handle carefully. First, turn off the power to the unit at the outdoor disconnect switch or the main electrical panel. Safety must always come first.
Take a standard garden hose with a spray nozzle and gently wash the outside of the unit. Spray at a downward angle to wash the dirt out of the fins. Never use a high-pressure power washer. The metal fins are incredibly fragile and bend easily. If you bend the fins flat, you permanently block the airflow and ruin the unit’s efficiency.
If you notice large patches of bent fins, you can purchase a specialized tool called a fin comb to carefully straighten them out. However, if the coils are deeply embedded with grime or if you are uncomfortable spraying water near electrical components, leave this task to a professional during your seasonal tune-up.
3. Check the Insulation on the Refrigerant Lines
Look at the back of your outdoor condenser. You will see two copper pipes running from the unit into your house. The larger of the two pipes is the suction line, which carries the cold refrigerant gas back to the compressor.
This larger pipe should be covered in a thick layer of black, foam-like insulation. This insulation prevents the cold gas from absorbing heat from the outdoor air before it reaches the compressor. It also stops heavy condensation from dripping off the pipe.
Over the years, exposure to the sun and weather can cause this insulation to crack, rot, or fall off entirely. If you see bare copper piping on the larger line, you need to replace the insulation. You can purchase replacement foam insulation sleeves at most hardware stores. Wrap the new insulation tightly around the pipe and secure it with high-quality weather-resistant tape. This simple fix significantly improves your system’s cooling efficiency.
4. Ensure the Unit is Level
The ground around your home can shift and settle over time, especially after heavy winter rains. If the concrete pad supporting your outdoor condenser sinks on one side, the entire unit will tilt.
An air conditioner must sit perfectly level to operate correctly. If the unit leans too far, the lubricating oil inside the compressor cannot circulate properly. Operating a compressor without adequate lubrication will cause it to seize and fail, resulting in a massive repair bill. Furthermore, a severely tilted unit can cause the fan motor to vibrate excessively, leading to premature wear on the bearings.
Place a carpenter’s level on top of the condenser. If it is noticeably out of plumb, you will need to adjust the pad. While you can sometimes use rot-resistant shims to level a slightly tilted pad, a severely sinking foundation requires professional intervention to lift and stabilize the heavy machinery safely.
The Importance of Professional Spring HVAC Maintenance
While replacing filters and clearing debris are excellent first steps, a modern HVAC system is a complex piece of electromechanical equipment. It contains high-voltage wiring, pressurized chemical refrigerants, and sensitive circuit boards. To truly prepare your system for the summer heat, you must invest in professional care.
Scheduling routine residential HVAC maintenance services in the spring is the smartest financial decision a homeowner can make. A comprehensive professional tune-up goes far beyond a basic visual inspection. Experienced technicians have the tools and training required to dig deep into your system, identify hidden wear and tear, and restore your equipment to factory specifications.
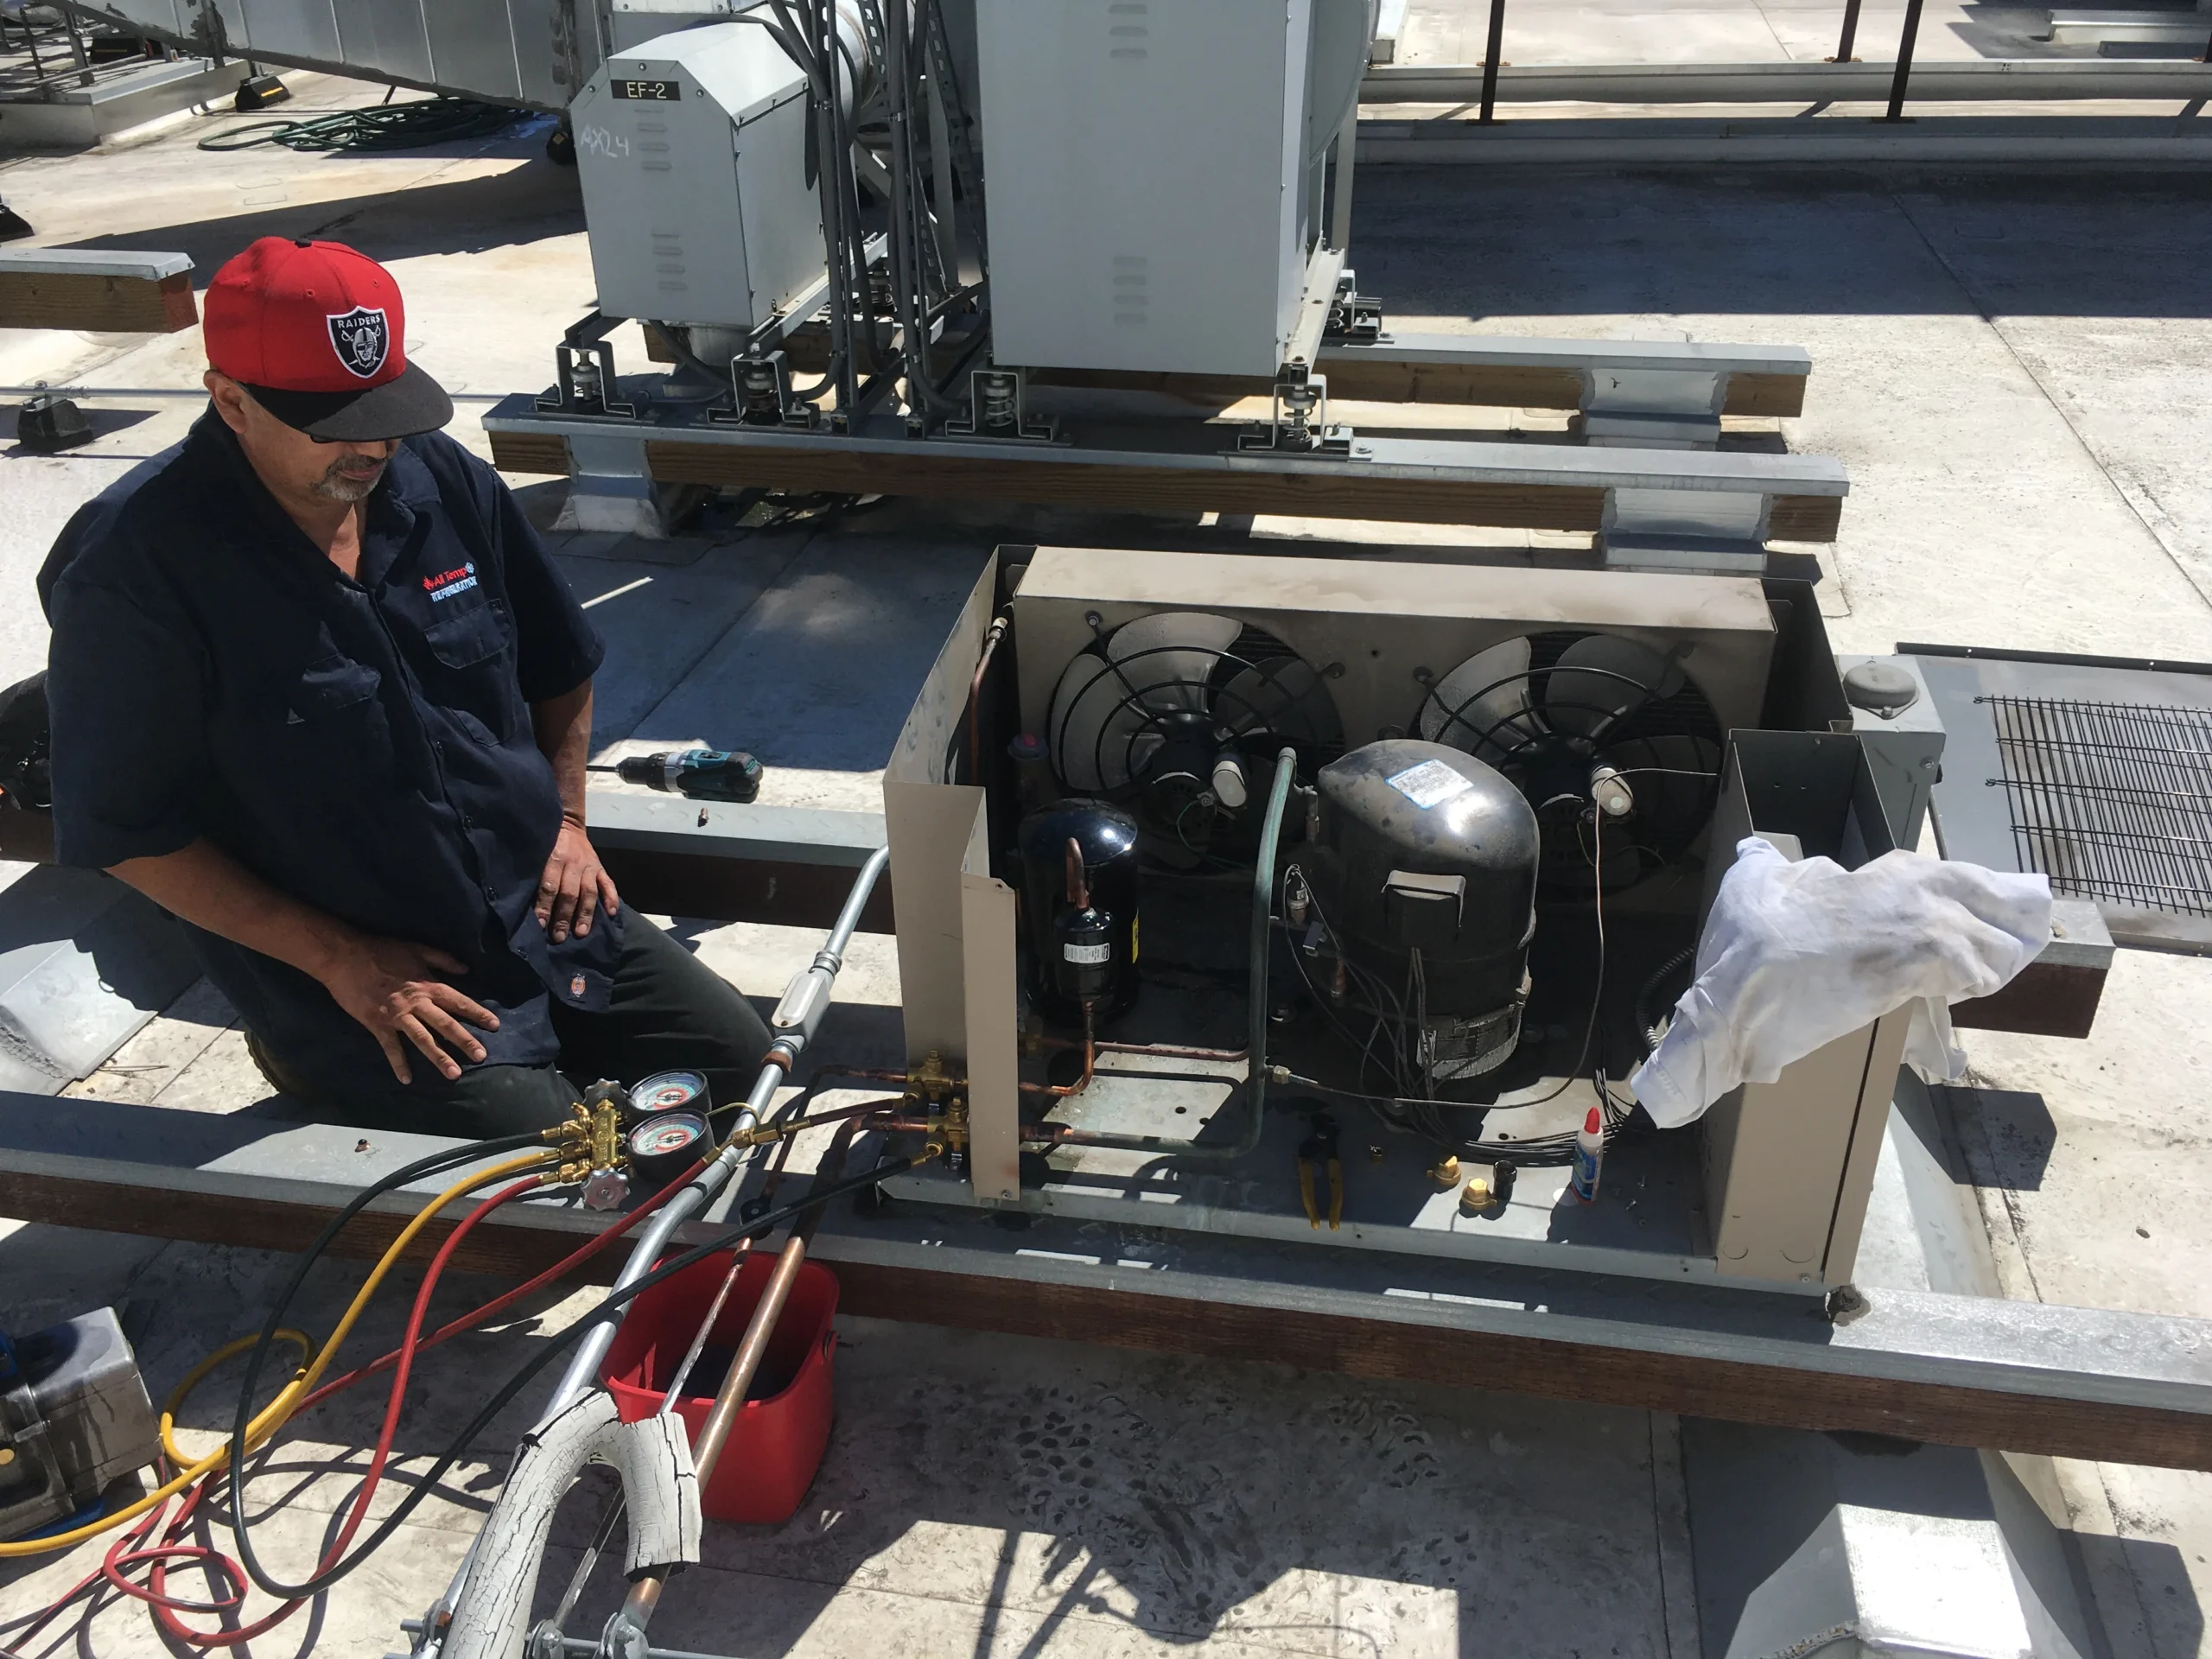
Checking and Balancing Refrigerant Levels
Your air conditioner does not consume refrigerant. The chemical circulates in a closed loop, constantly changing from a liquid to a gas to absorb and release heat. Therefore, if your system is low on refrigerant, it means you have a leak.
Running an air conditioner with low refrigerant is incredibly damaging. The system loses its ability to cool the air, causing it to run continuously without ever satisfying the thermostat. Even worse, the compressor relies on the returning cold refrigerant to keep itself cool. Without enough refrigerant, the compressor will overheat and burn out.
During a spring tune-up, a technician will hook up specialized gauges to measure the exact pressure and temperature of your refrigerant. If the levels are low, they will not simply top it off. They will use electronic leak detectors to find the source of the leak, repair the damaged copper tubing, and then recharge the system with the precise amount of refrigerant required. Proper refrigerant charge is absolutely critical for achieving peak energy efficiency.
Deep Cleaning the Indoor Evaporator Coil
We discussed cleaning the outdoor condenser coils, but the indoor evaporator coil is equally important. Located inside your dark, damp air handler, this coil is highly susceptible to mold and mildew growth. Even with regular filter changes, microscopic dust particles inevitably slip through and stick to the wet condensation on the coil.
A dirty indoor coil cannot absorb heat effectively. The dirt acts as an insulator, and the moisture allows mold spores to multiply rapidly, sending a foul, musty odor through your home.
Cleaning the evaporator coil is not a DIY project. The coil is hidden behind sealed metal panels and features incredibly delicate fins. A professional technician will carefully remove the access panels and use specialized, non-acidic foaming cleaners to break down the grime and sanitize the coil. This process restores the unit’s cooling capacity and drastically improves your indoor air quality.
Electrical Inspections and Calibration
Heat and vibration take a toll on electrical components. Over the winter, the constant cycling of your heating system can cause wire connections to vibrate loose. Loose connections create electrical resistance, which generates heat and can eventually cause wires to melt or short circuit.
During a professional maintenance visit, the technician will inspect every inch of your electrical system. They will tighten all wire terminals, inspect the heavy-duty contactors for pitting or burn marks, and test the safety switches.
They will also test your capacitors. Capacitors are small, cylindrical devices that store electricity and deliver a massive jolt of power to start the compressor and fan motors. Capacitors degrade over time. A weak capacitor will struggle to start the motor, causing a “hard start” that draws excessive electricity and damages the compressor. By testing the microfarad reading of the capacitor, a technician can identify a failing part and replace it long before it causes a sudden breakdown on a hot day.
Extending the Lifespan of Your Equipment
HVAC systems are massive financial investments. You want your equipment to last as long as possible. Neglecting routine maintenance is the fastest way to send a furnace or air conditioner to an early grave.
When dirt, friction, and poor electrical connections force your system to work harder, the mechanical components wear out rapidly. Routine spring maintenance drastically reduces this unnecessary strain. By keeping the coils clean, the motors lubricated, and the airflow unrestricted, professional tune-ups add years of reliable life to your system.
Furthermore, most HVAC manufacturers require proof of annual maintenance to keep their comprehensive warranties valid. If your compressor fails in its fifth year and you cannot provide documentation that the system was professionally serviced, the manufacturer can deny your warranty claim, leaving you responsible for the entire cost of the repair.
Knowing When to Call for Repairs
While performing your spring checklist, you might discover issues that go beyond basic maintenance. If your system makes strange noises, fails to turn on, or blows warm air, do not ignore the problem. Minor malfunctions rarely resolve themselves; they simply grow worse over time until they cause a catastrophic failure.
If you suspect your system is struggling, immediately book residential HVAC repair services. Having a professional diagnose and fix a weak motor or a failing electrical component in April is far less stressful than dealing with an emergency breakdown during a sweltering heatwave in August. Proactive repairs protect your comfort and prevent expensive secondary damage to your equipment.
Preparing for Bay Area Microclimates
As you work through your spring checklist, keep your specific Bay Area location in mind. If you live in a coastal area like San Francisco or Pacifica, your cooling demands will be lower, but the salty ocean air can accelerate corrosion on your outdoor condenser. You may need to wash your outdoor unit more frequently to prevent rust from destroying the metal fins.
If you live in the East Bay or South Bay, your air conditioner will see heavy use starting in late spring. Prioritize securing a professional tune-up early in the season before the technicians’ schedules fill up with emergency calls.
Regardless of your exact location, the core principles of HVAC maintenance remain the same. Clean equipment, proper airflow, and professional oversight guarantee a comfortable, energy-efficient home.
Partnering with Local Experts
Navigating the complexities of home climate control does not have to be a solitary endeavor. Partnering with a trusted, local HVAC provider ensures that your system receives the exact care it needs to thrive in our unique environment.
Our team understands the specific challenges Bay Area homeowners face as the seasons change. We are dedicated to providing honest, transparent, and highly skilled service to our community. If you want to learn more about our commitment to excellence and the experience we bring to every job, read about our team and discover why we are the trusted choice for local climate solutions.
Do not wait for the summer heat to expose the weaknesses in your cooling system. Take action now to prepare your home. Complete your indoor and outdoor checklists, change those dirty filters, and secure your professional tune-up. If you need assistance with any step of the preparation process, or if you are ready to schedule your comprehensive spring maintenance visit, please contact us today. Our expert technicians are ready to optimize your system, lower your energy bills, and ensure your absolute comfort all season long.
Stay Comfortable Year-Round With Expert HVAC Service
Book a trusted technician to handle your heating or cooling issue—fast, professional, and done right the first time.
Book Service Now